-
Innowalk Pro is a medical device, provided by Made for Movement. It must always be operated in strict adherence to the accompanying users manual. Failure to follow these instructions may result in personal injury.
The Innowalk Pro should only be used under the recommendation and guidance of a clinical professional.
This training document is intended to supplement the official user manual and should never be used as a replacement.
Daily and monthly Pre-check must be carried out to identify any wear or damage to critical components.
-
A coordinator is an individual with a clinical background who has been trained in operating the Innowalk Pro.
- If the coordinator is also the responsible clinician or therapist, they are responsible for assessing the user/patient to determine whether the person is a suitable candidate for use of the device, in accordance with the user manual.
- If the coordinator is not the responsible clinician or therapist, the assessment must be carried out by the responsible clinician or therapist before the device is fitted and used by the user/patient.
-
An Innowalk Pro Operator is a trained individual responsible for preparing and setting up the device for users/patients, based on personal settings forms provided by the Innowalk Pro coordinator.
The operator must have completed training in the use of the device and is responsible for handling it in strict accordance with the user manual, ensuring safe and proper operation at all times.
-
The clinician or therapist in charge of the users/patients has the responsibility to assess if the user/patient is a candidate for using the Innowalk Pro. This person is also responsible for evaluating possible risks and side effects against expected benefits of using the device.
Contraindications:
- Bone fractures in lower limbs and/or torso (legs, pelvis, spine)
- Open skin lesions in areas of the body in contact with parts of the Innowalk
Precautions for use:
- Major deformities (spine and lower limbs)
- Severe or fixed contractures in the lower limbs (Hip and knee flexion contractures >40°, pes
equinus >25°) - Osteoporosis with previous or suspected spontaneous fractures of the lower extremities
- Joint instability in the lower limbs (hips, knees, and ankles)
- Circulatory disorders
- Respiratory disorders
- Cardiac disorders
- Epilepsy with uncontrollable grand mal seizures
- Severe spasticity interfering with positioning and movement in the Innowalk
- Pain while in standing weight-bearing position or when moving lower limb
See User manual chapter 7. -
The frequency, duration intensity of use in the Innowalk Pro is decided by the responsible clinician or therapist per individual case and based on:
- Medical condition
- Goal of mobilisation
- Response to mobilisation
This person is also responsible to follow up the user’s/patient's response and adjust duration in accordance with this.
Each user/patient should be closely observed by a responsible trained person while standing in the Innowalk Pro. This is to be able to react adequately on the patient’s response to being upright standing and mobilised. Observe the following:
- Inappropriate alignment
- Hyperextension of knees
- Heels lifting from the footplate
- Signs of discomfort
- Pain
- Fatigue
In general, observe reactions that might occur due to new or changed physical & physiological conditions.
See Users manual chapter 5.
-
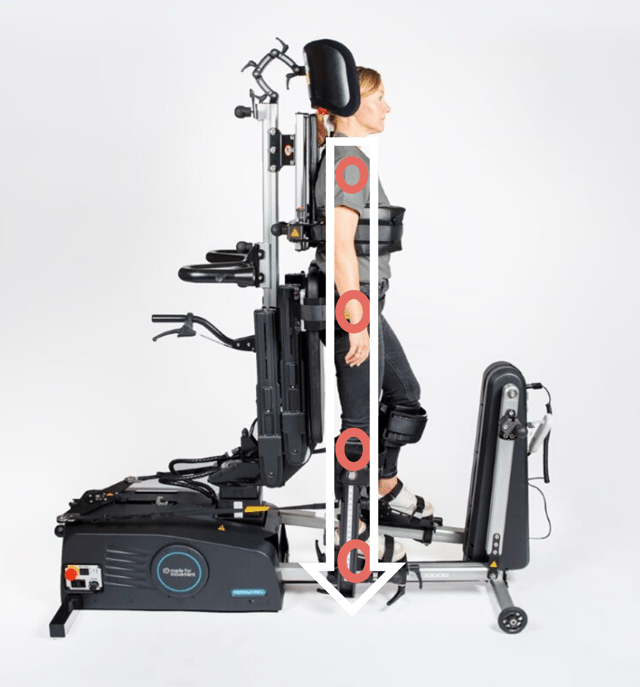
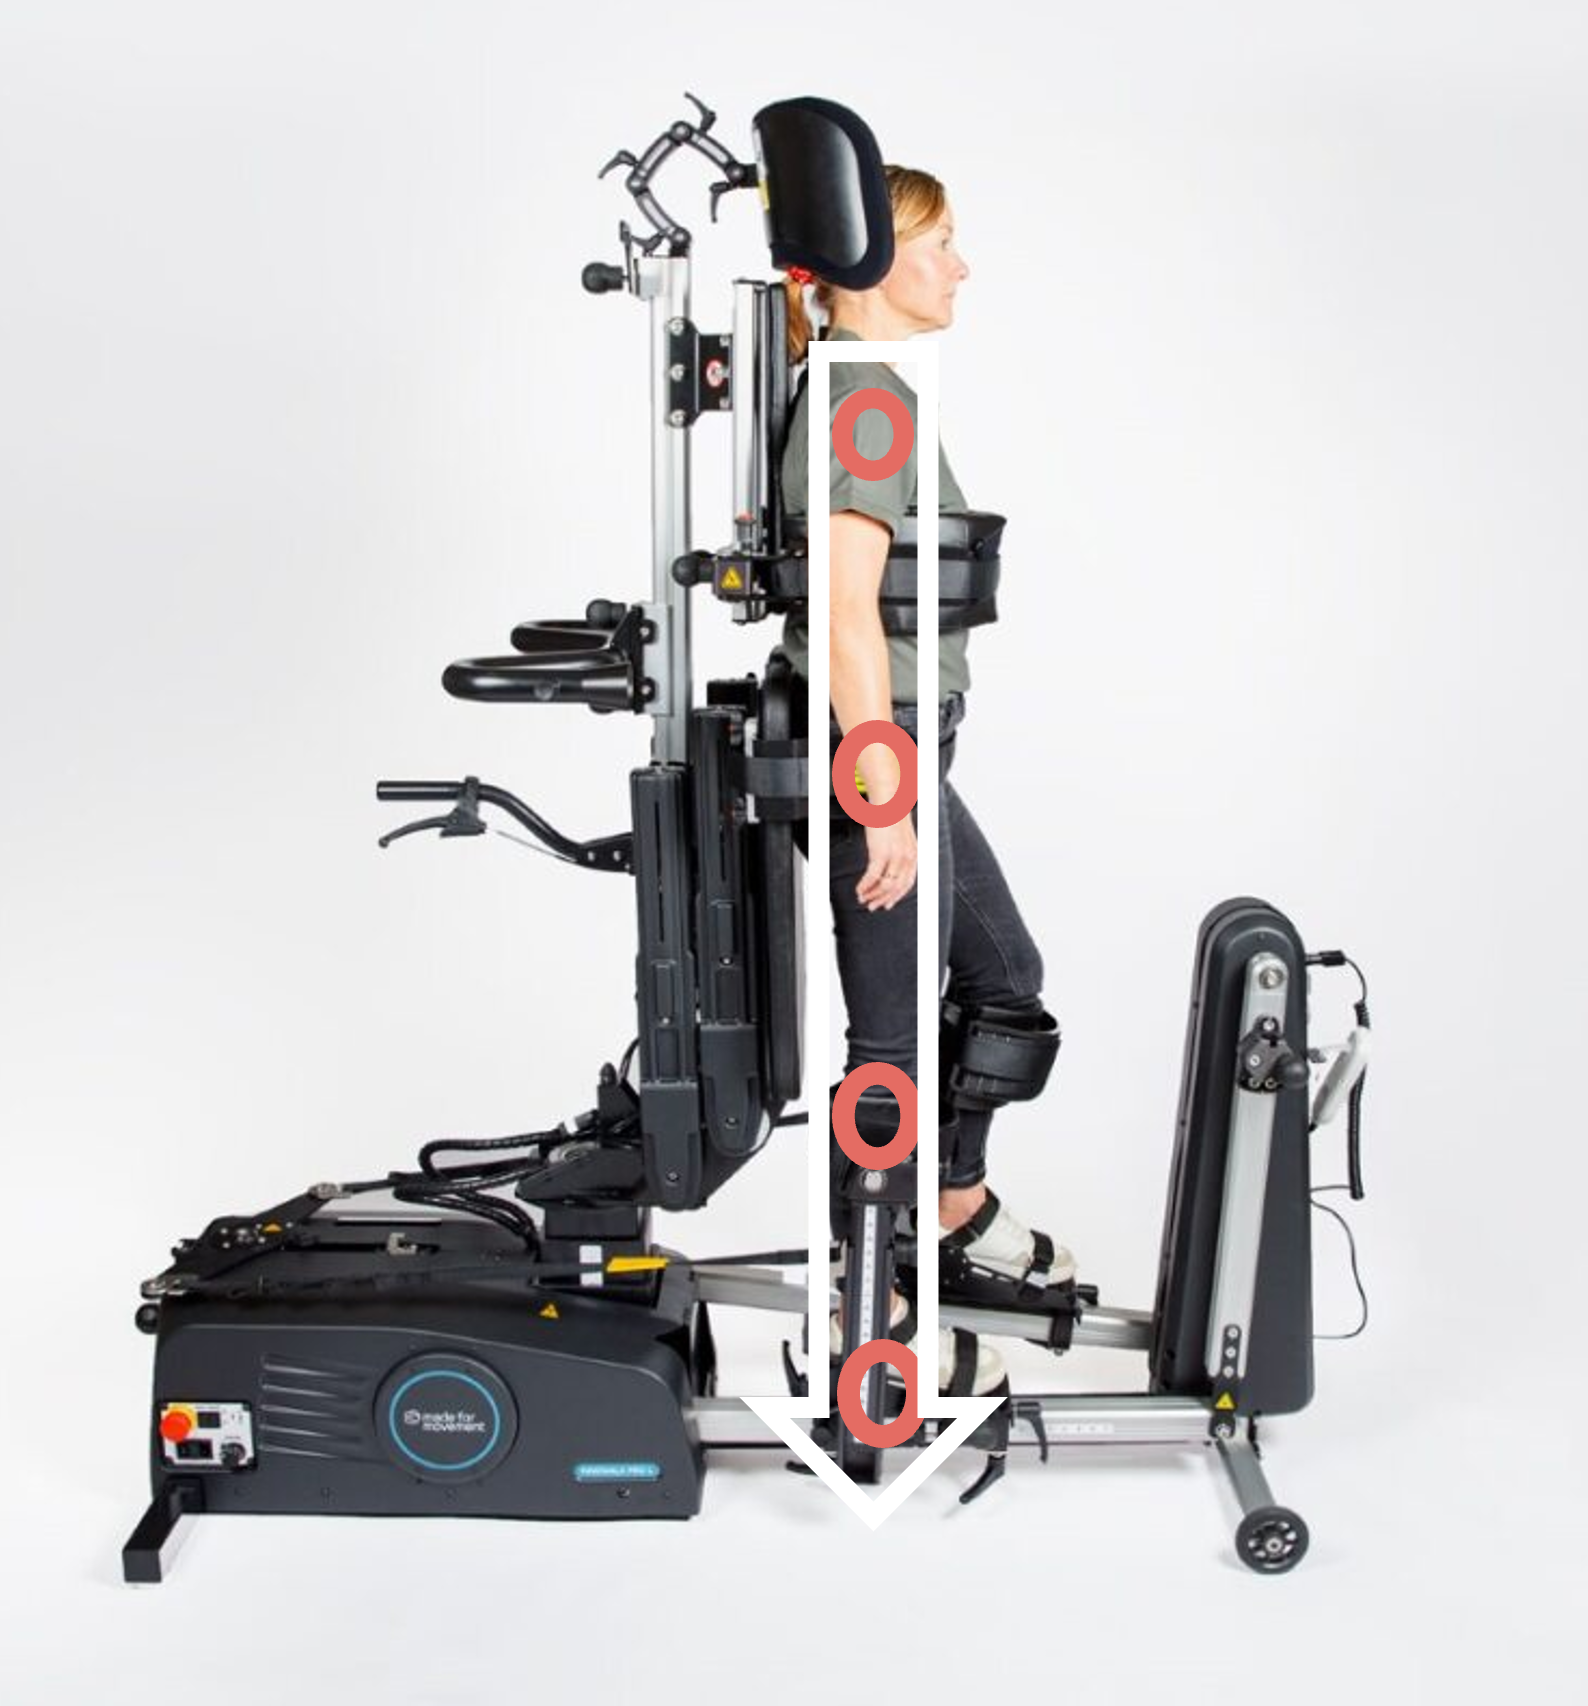
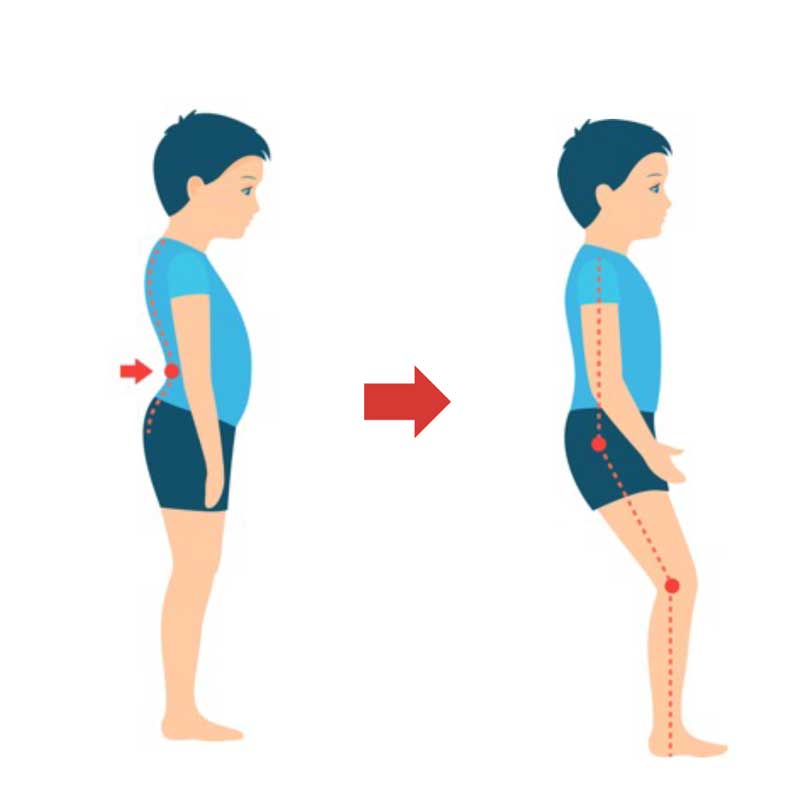
The aim is to optimise the person's position in the Innowalk Pro
- Joint over joint
- Symmetry
Three important support points on the Innowalk Pro
- a. Chest support
- b. Pelvic support
- c. Leg support
Supporting points need to be adjusted to achieve appropriate position in standing.
The goals are to
- Maintain skeletal alignment.
- Facilitate normal movement patterns or control abnormal movement patterns.
The positioning in the Innowalk Pro is dependent on the individual's range of motion in joints, muscle tone/stiffness, upper body control and leg length discrepancy.
Identify and pay attention to:
Range of Motion (ROM)
- Identify range of motion in hips, knees and ankles
- Position in lying is a good indication on what to expect in standing position
- Adjust the device in accordance with limitations in ROM
- Avoid joint stress and ligament overload when positioning the user
Muscle tone/stiffness
- Identify the users muscle tone/stiffness
- Take into considerations muscle tone reaction when the person is being moved
- Adjust device in accordance with limitations related to muscle tone/stiffness. Pay extra attention to the spams control setting
Head and upper body control
- Identify level of control the user has over head and upper body, and asymmetry related to for example scoliosis
- The type of support the user has while sitting in the wheelchair, might be necessary when in standing position too
- Prepare use of for example shoulder straps, tray, front tilt
Leg length discrepancy
- Identify if the user has a leg length discrepancy
- To avoid asymmetry while standing, an extra sole in the foot plate can be used
-

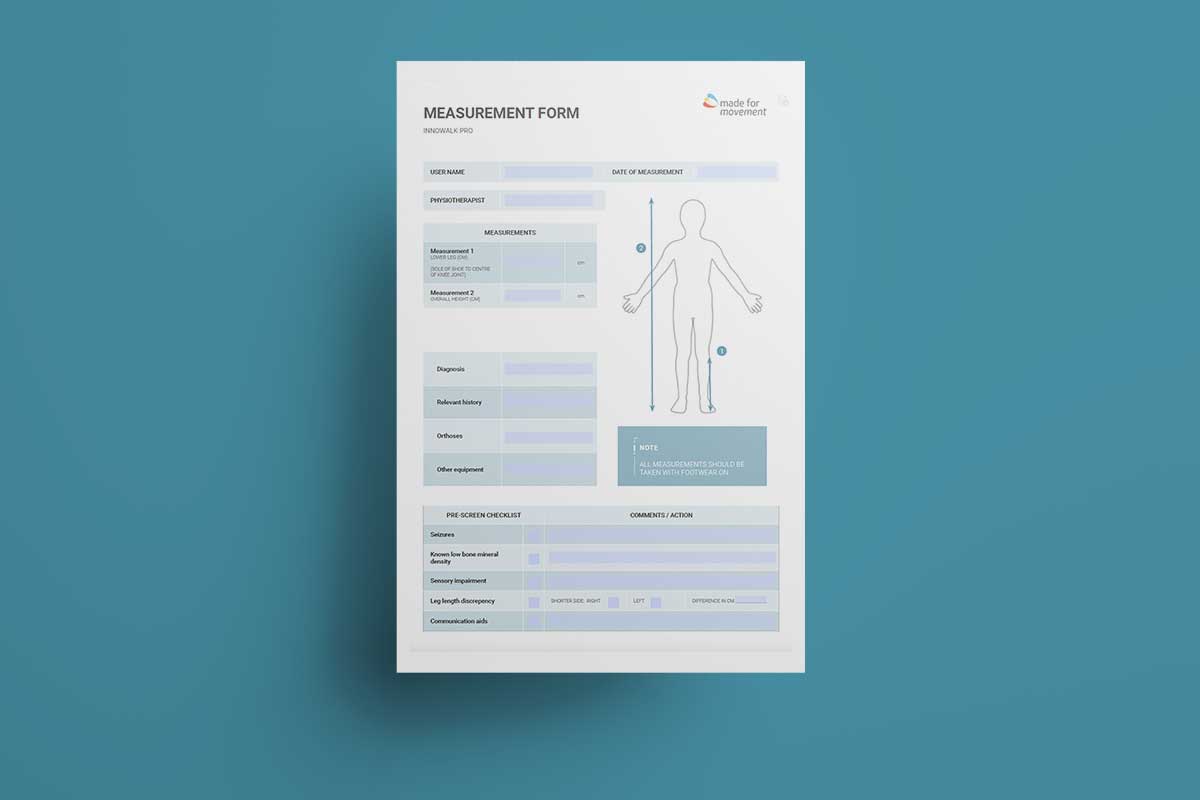
The measurement form can be used during the assessment and before preparing the Innowalk Pro to the user/patient specifications.
Here is a link to the measurement form.
-

The form for personal settings can be used to register the set up of the Innowalk Pro to a specific user/patient and replicate settings at a later session.
It is alway the Innowalk Pro Coordinator with a clinical background who will identify if the user/patient as an appropriate candidate for the Innowalk Pro. It is also the coordinator who will set up the device to the user/patient for the first time and fill out the "Personal setting form".
-
The Innowalk Pro have integrated transport wheels. The wheels are hidden behind the side covers of the product and are lowered by using the crank arm.
- Ensure the tilt in space function (the front of the Innowalk Pro) is at its loweste position before lowering the transport wheels with the crank.
- Remove the guide straps from the strap hooks before activating the crank.
- Turn the crank handle counterclockwise so that the pully arm moves toward the seat.
- Swing the pully arm so that the wheel hook can be attached to the wheel pin. Make sure that the two green arrows, on the wheel hook and wheel pin, point towards each other.
- Turn the crank handle clockwise until the wheels are lowered to the floor.
- Move and place the Innowalk where it will be used.
- Turn the crank handle counterclockwise to raise the wheels back under the cover and the wheel pin is back to its starting position. The rear legs are now in contact with the floor.
- Release the wheel hook on the pully arm from the wheel pin (by swinging it to the left).
- Turn the crank handle clockwise so that the pully arm returns to its starting position, indicated by the stop screw. The Innowalk is now ready for use.
This is how you transport the Innowalk Pro
-
On and off
-
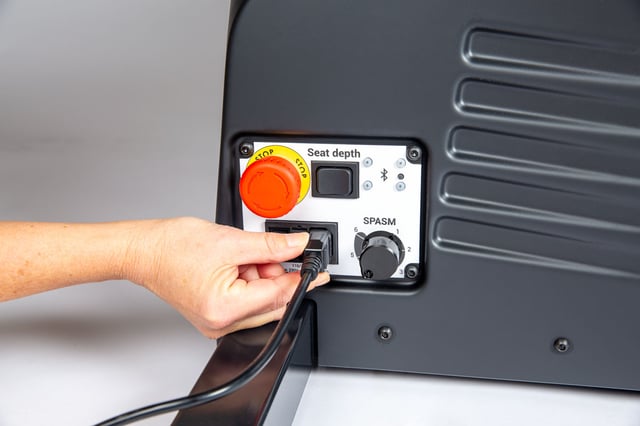
It is on the side panel. Attach the electrical cable to the product, before connection to the power outlet.
-
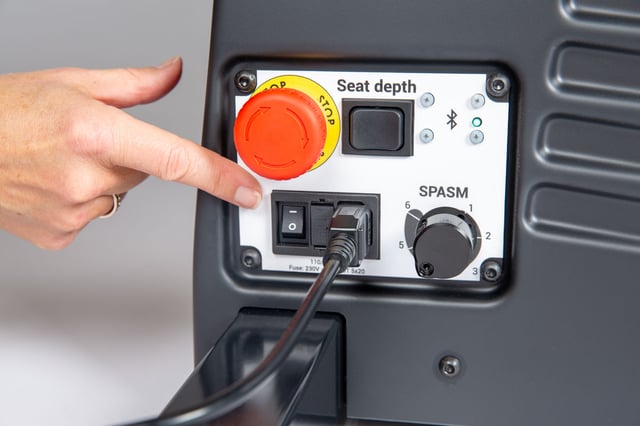
The button is on the side panel. When turned on - WAIT for a long “beep” sound, before you push any buttons. When the device is on and ready to be used the LED on the top right is "Green".
-
-
Innowalk Pro has an emergency seat lowering mechanism that can be use if the device lose external power or the remote control does not work. The emergency mechanism allow you to manually lower the seat to sitting position.
The emergency release is located at the bottom of the back column. To activate the emergency release, the safety lock on the handle must first be released.
The emergency seat lowering should in normal working conditions not be used.
If the emergency lowering mechanism has been used, please perform a troubleshooting test to ensure that all functions on the Innowalk Pro are working before entering a new user/patient:
- Check that power is on
- Check that the emergency stop switch is not pushed in
- Perform a reset-function called "homing". Press and hold both the “stand” and the “sit” – button on the remote control. While holding you hear one long high pitched beep and you will see the actuator move towards an upright position. When the actuators reach the end position a confirmation beep will sound and you can release the buttons. Homing is now done. When this sequence is finished, the sit to stand function should react normally to input on the remote control.
- Check that the device respond to all other functions on the remote control.
If the device is not responding as intended, please contact your Made for Movement representative and report failure.
-
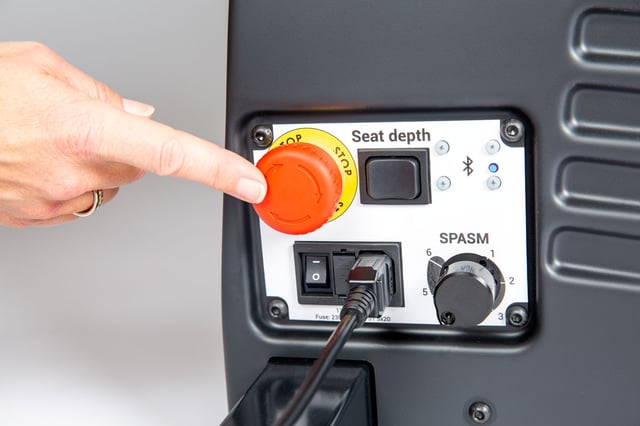
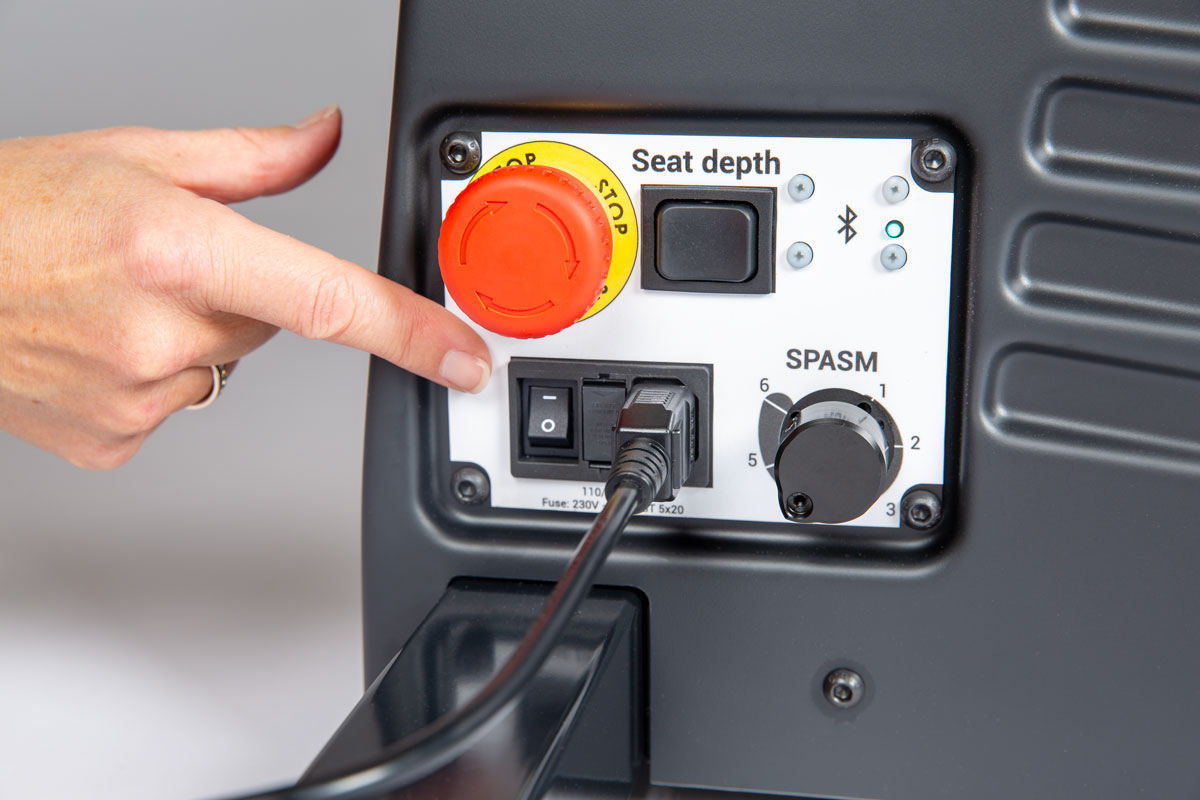
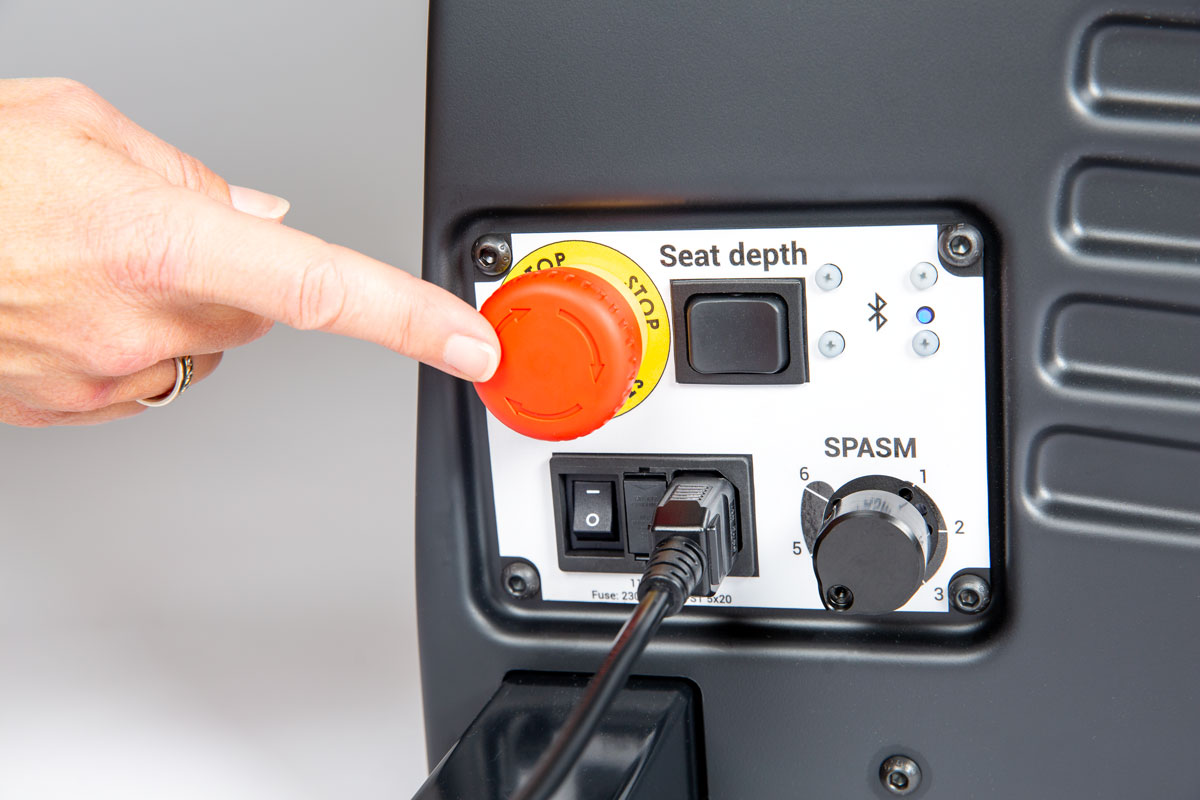
The emergency stop switch is located on the side panel. Push the emergency stop switch to disconnect the power. Rotate the switch to activate the power.
-
Seat and upright actuator homing
If the sit to stand function doesn’t respond to the remote control, a reset-function called “homing” must be performed.
Warning: Never perform “homing” with the user/patient in the product.
- Power on the device.
- Simultaneously press and hold the "Stand" and "Sit" buttons. You will hear a short beep and after approx. 8 seconds you will hear a longer high pitch beep and the unit will begin to engage in standing, keep holding the sit to stand buttons.
- When the homing is complete you will hear a short confirmation beep. Now you can release the buttons. Homing is completed.
- When this sequence is finished, the sit to stand function should react normally to input on the remote control.
Seat height actuator homing
If the seat height function doesn’t respond to the remote control, a reset-function called “homing” must be performed.
Warning: Never perform “homing” with the user/patient in the product.
- Power on the device.
- Simultaneously press and hold the "Seat up" and "Seat down" buttons. You will hear a short beep and after approx. 8 seconds you will hear a longer high pitch beep and the unit will begin to engage in raising, keep holding the "seat up" & "seat down" buttons
- When the homing is complete you will hear a short confirmation beep. Now you can release the buttons. Homing completed.
- When this sequence is finished, the seat height function should react normally to input on the remote control.
E-seat depth actuator homing
If the seat depth function doesn’t respond to the remote control, a reset-function called “homing” must be performed.
Warning: Never perform “homing” with the user/patient in the product.
- Power on the device.
- Press and hold the seat depth adjustment button on the side panel to move the seat depth fully inward (minimum depth) until it stops automatically and you hear a "beep". This completes the E-Seat homing process.
- When this sequence is finished, the E-seat depth adjustment should react normally to input on the adjustment button.
Note: It is good practice to perform the homing (reset) function at the end of the final session each day. This ensures that the electronic components in the e-seat are properly reset.
-
The seat on the Innowalk Pro can be turned to either the left or the right side, for easier transfer in and out.
Pull down and turn the index bolt under the front of the seat to the side to release the locking mechanism for the swivel seat.
Rotate the seat using your other hand.
-
Swing out the upper part of the leg support by pulling the index bolt - lift the leg support upwards and rotate it.
Release the bolt at the back to fold the leg support all the way down parallel to the ski.
-
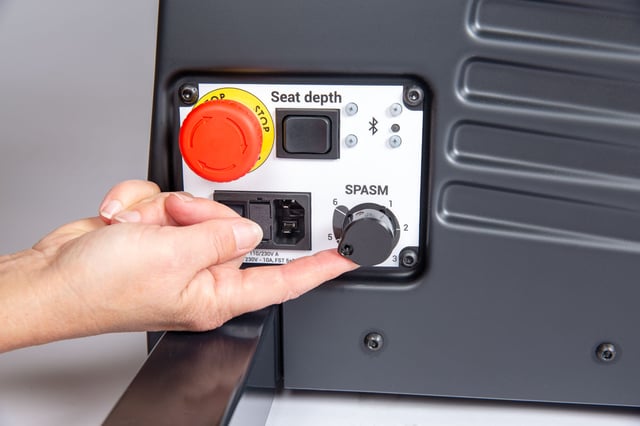
The spasm control indicator is located on the side panel. The objective with the spasm control function is to stop the Innowalk if the user has a spasm in the legs.
The spasm resistance level is set individually for each user. If a user has a spasm that exceeds the threshold set, the Innowalk motor will pause. When the spasm is over, the Innowalk will slowly start again.
Adjust the spasm between value 1-6.
1 indicates the lowest level (most sensitive) and 6 the highest level (least sensitive)
At level 1, little force is needed to activate the spasm control and stop the motor and at level 6, a higher force is needed to activate the spasm control and stop the motor.
-
The front tilt function allows for a reclined sitting and/or standing position. The tilt function can be used if a user presents with limited upper body and head control.
The measurement scale (1-20) is found above the front wheels.
-
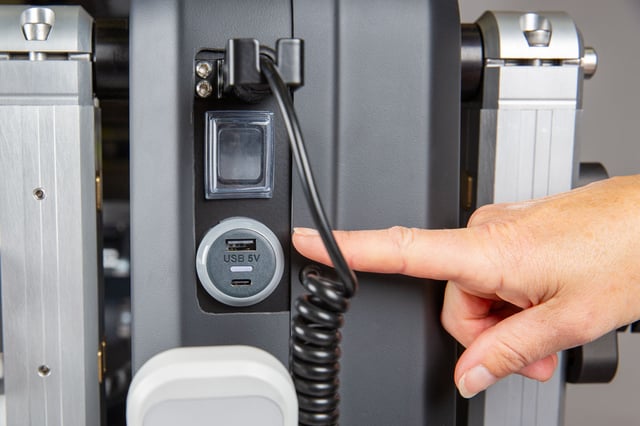
The USB charger at the front of the Innowalk Pro can be used to charge handheld devices e.g. a tablet or phone.
-
Seat depth
The electronic seat depth switch is located on the side panel.
By pressing the left arrow, the seat depth will be increase to fit larger users.
Decrease the sitting depth for smaller users by pressing the left arrow.
Adjustments should be done primarily before the user is placed in the product. Minor adjustments can be done with the user in but needs to be done with great care.
Use the length indicator on the underside of the seat plate to replicate desired seat depth.
Seat height
Adjust height of the seat on remote control.
The sitting height should be adjusted so there is a 90-degree angle in the knee joint, when the user’s feet are resting on the foot plate.
Use the height indicator to replicate desired seat height.
-
Use one adjustment dial to change both the height and width of chest support.
Height - align the top of the bracket with the the measurement scale.
Width - align the middel of the adjustment dial to the measurement scale.
-
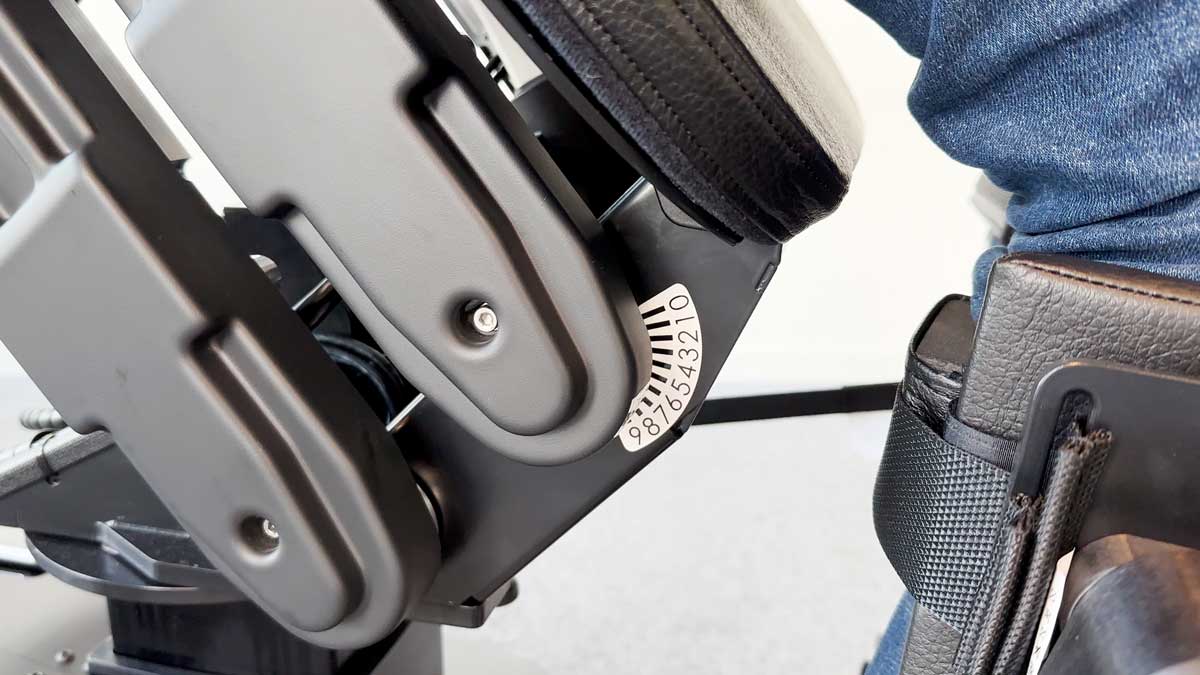
Lengthwise position
The foot plates can be adjusted lengthwise.
Loosen the handle screws under the foot plate and adjust it back and forward.
Tighten handle screws in correct position.
Use the position indicator ruler to replicate desired position to the other side.
The aim is to position the foot plates in a position where the user is aligned with hips over knees and knees over ankles in standing position.
Sideway position
The foot plate can be adjusted sideways.
Adjust the width of feet position by loosening the handle screws at the front and back of the foot plate.
Use the position indicator ruler to replicate desired position to the other side.
-
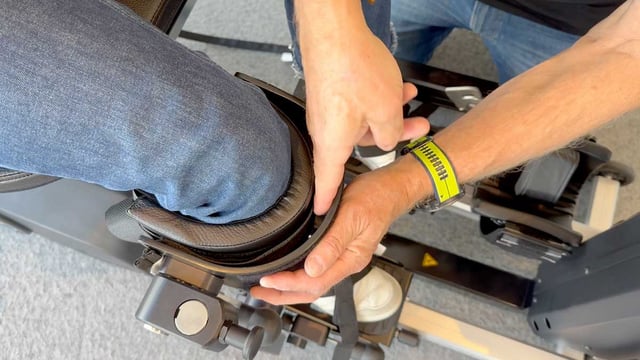
Leg support height
Use the adjustment dial at the from of the leg support to adjust the height.
Adjust the height of the leg support so the upper part of the padding is approximately 1 cm under the patella.
Choose the standard support padding (thin) or the thick padding.

Leg support padding strap tension
Make sure the Velcro on the knee support is properly aligned for correct positioning.
Start with tension level 1 as the standard setting. To move the knee further back in the calf bow, adjust to tension levels 2 or 3.
The centre of the knee should align with the centre of the leg support attachment point.
-
The cam stop dial located parallel to the foot plate reduces the range of motion of the leg support and may be used to reduce hyperextension at the knee.
Clockwise turning - Cam stop moves toward leg support to reduce knee extension.
Anti-clockwise turning - Cam stop moves away from leg support, allowing knee extension.
-

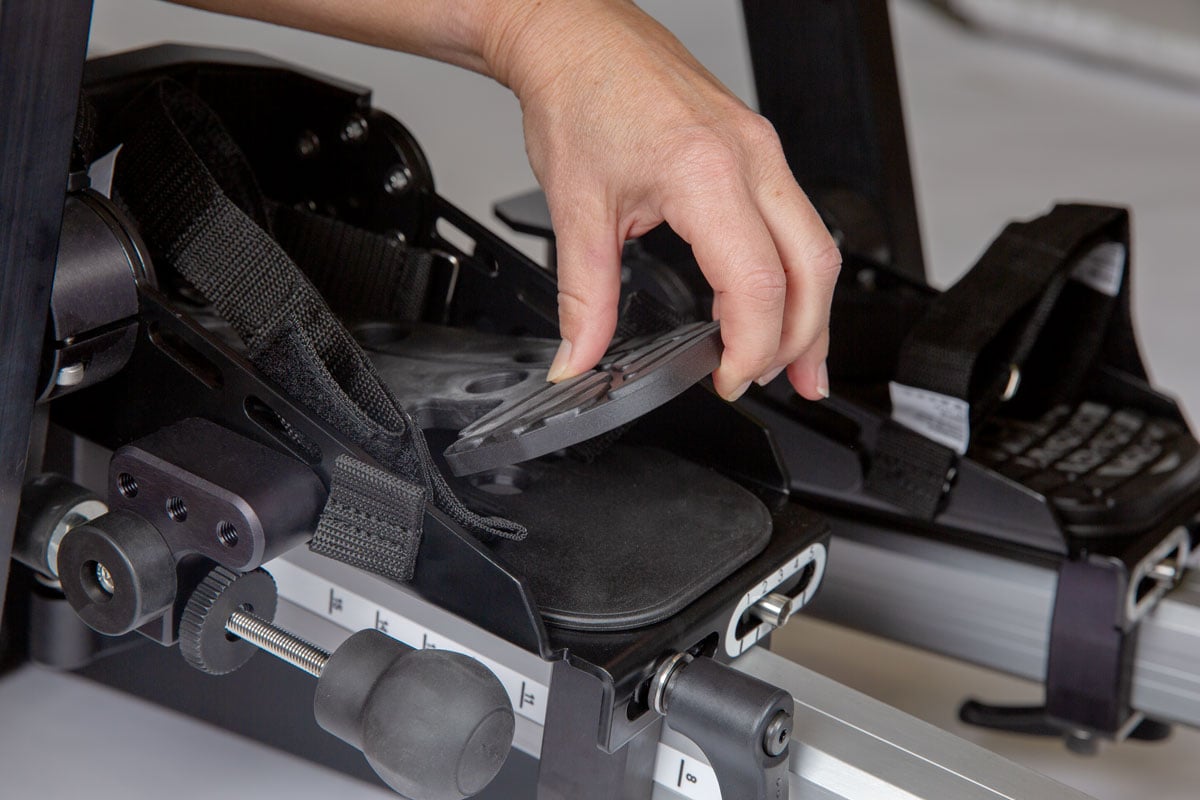
Insert the extra sole to compensate for leg length discrepancy, if needed.
One sole is 1 cm. You can stack up 2 cm.
-
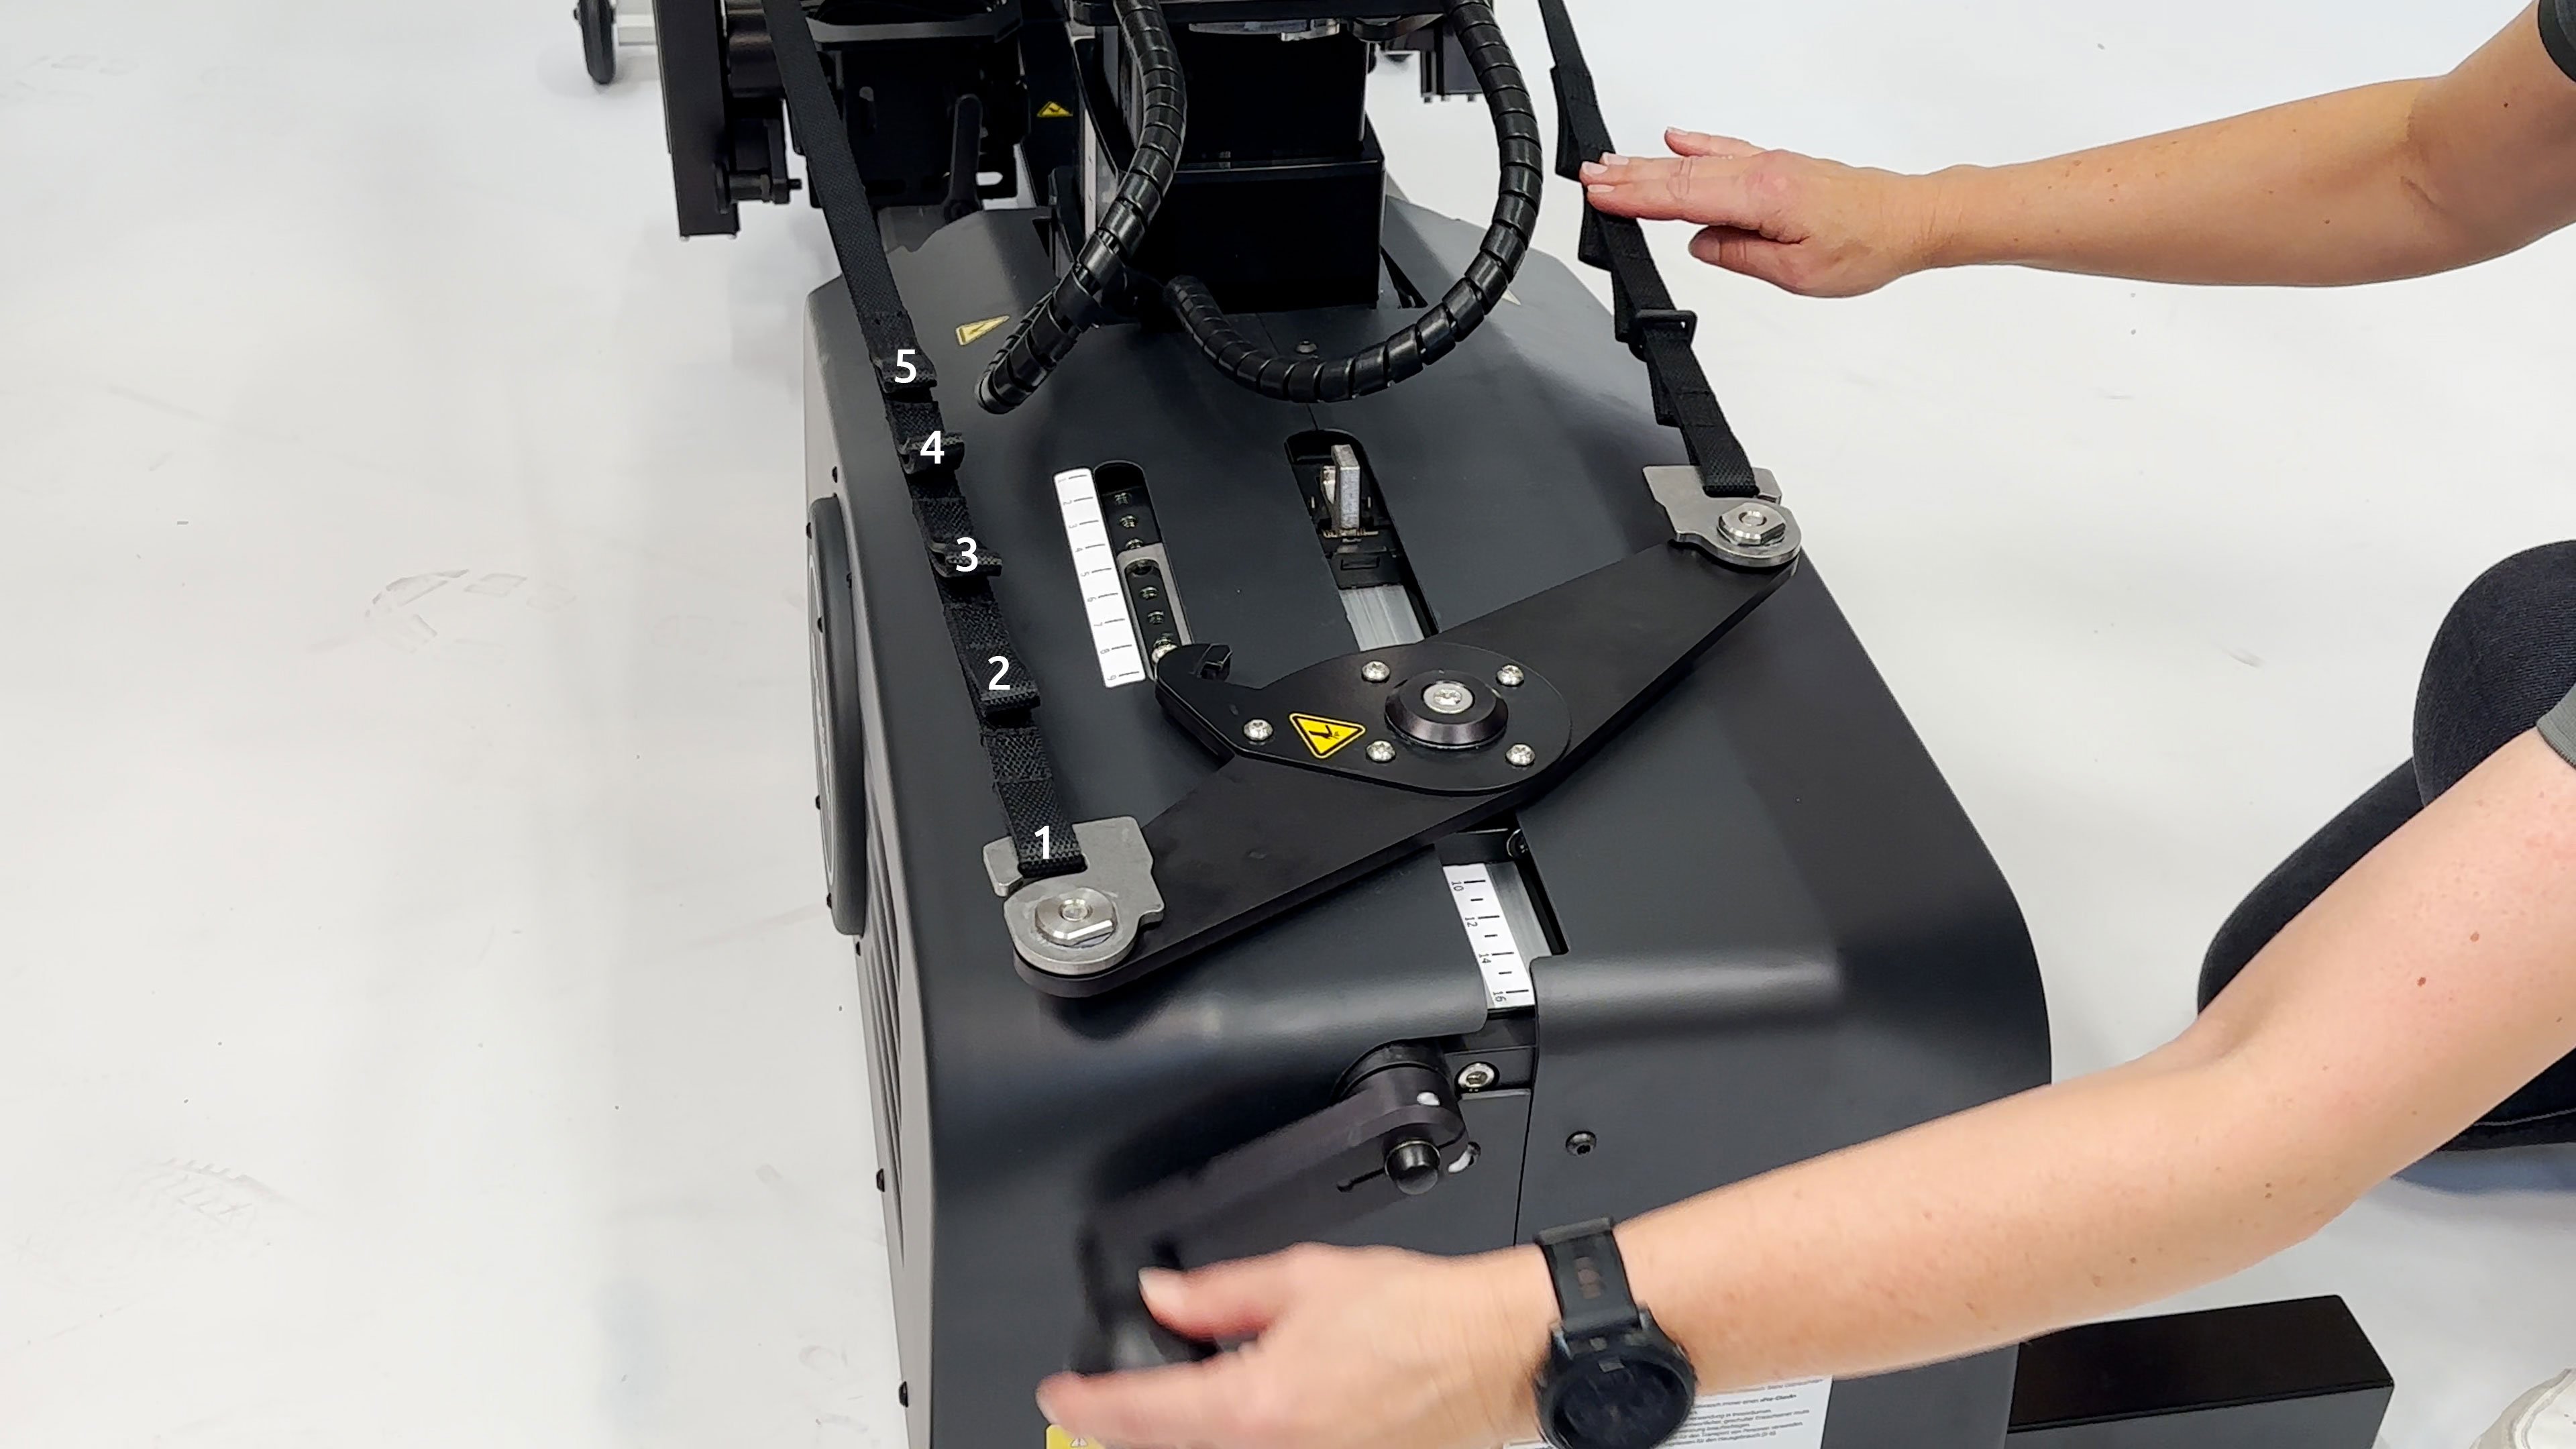
Attach the guide-strap
Attach the guide-strap to the hock on the leg support on both sides, before adjusting the length of the guide-strap.
Warning: Never bring a user into standing without attaching guide-straps to both sides.
Length of guide-strap
The position of the leg support is adjusted by the length of the guide-strap.
To provide an optimal position of user/patient, define the desired length on the guide-strap.
The guide-strap length is adjusted by using the crank-handle at the back of the device.
Clockwise turning – to shorten the guide-strap.
Anti-clockwise turning – to lengthen the guide-strap.

Guide-strap loops
In most cases the length of the guide-strap is handled by using the crank-handle. In cases where there is a need to shorten the guide-strap further, the loops on the guide-strap can be used.
There are 5 loops. Standard is loop nr. 1.
-
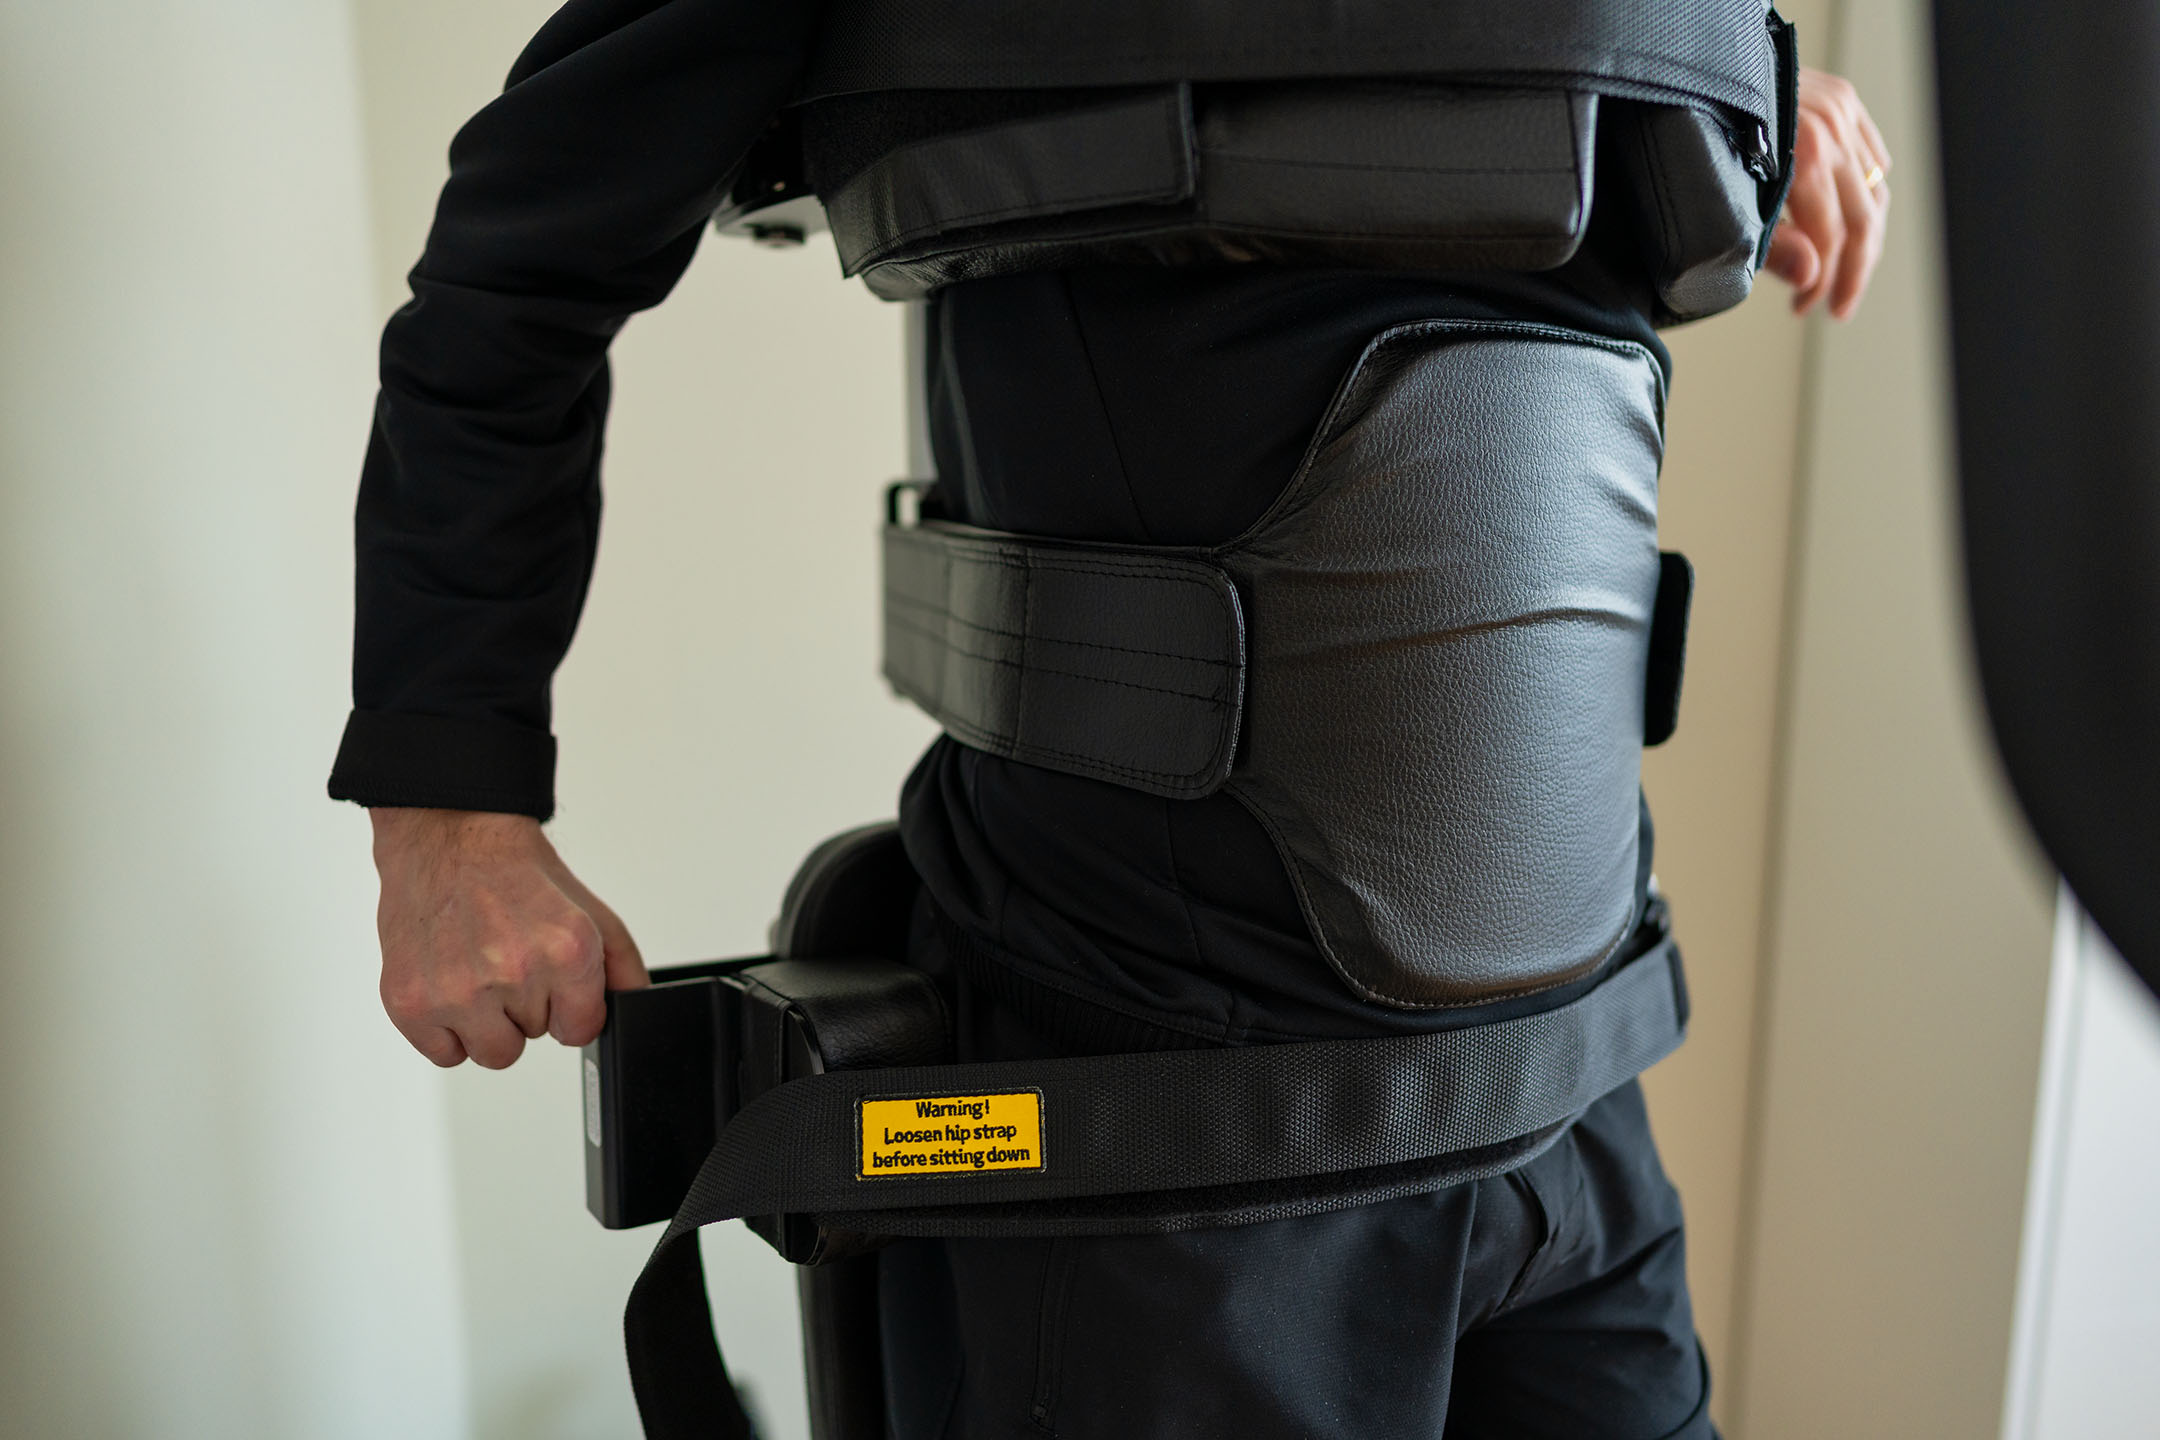
The hip support can be adjusted in height and width.
Adjust Width: Use the middle wingnut
Adjust Height: Use all three wingnuts -
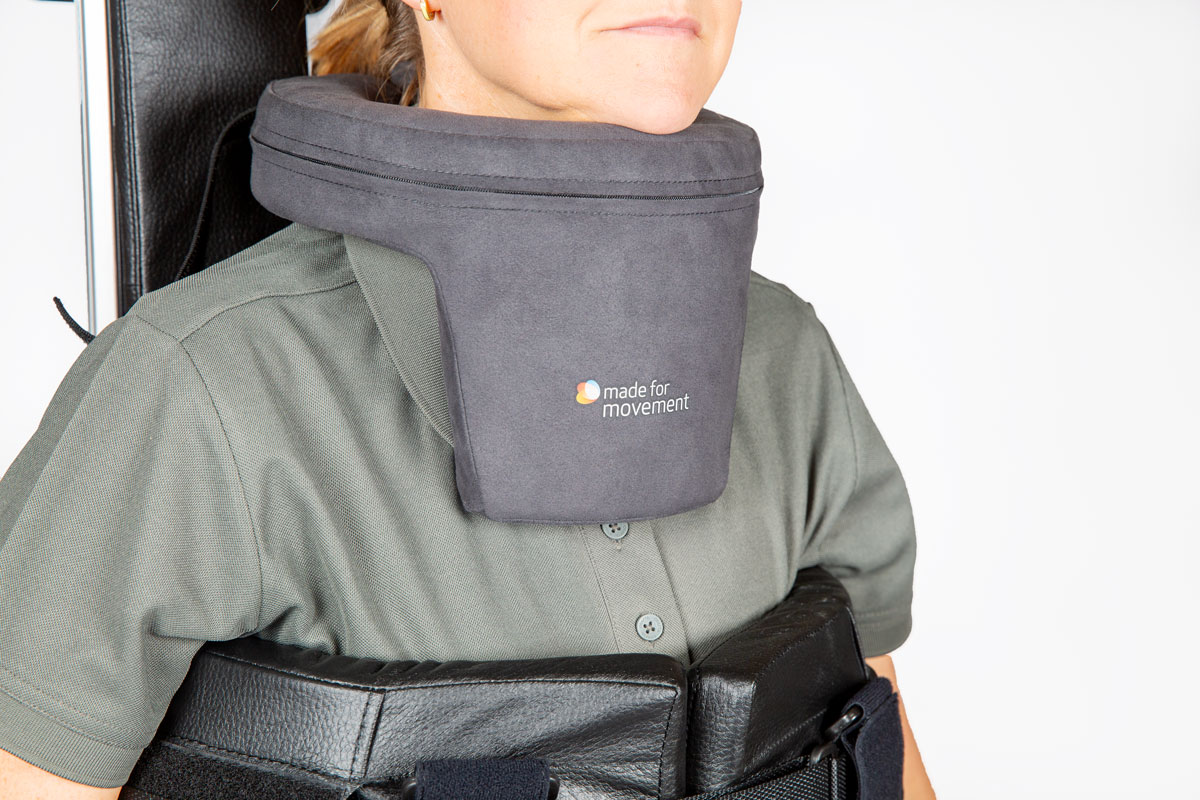
The position of the head rest can be adjusted by loosing the handle screws and moving the head rest to the desired position.


-
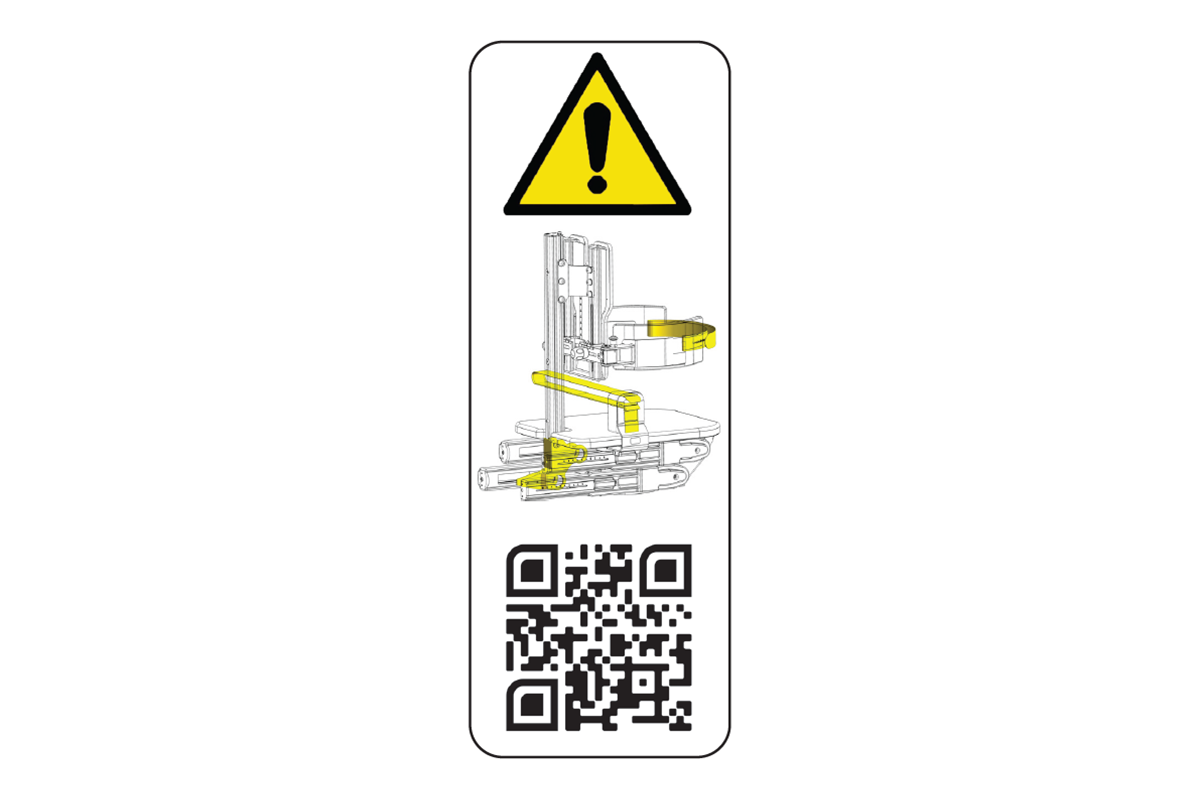
 Pre-check shall be conducted daily and monthly. At the back of the neck support, there is a label with a QR code. Scan the code to get access to the Pre-check in your prefered language or click here.
 -
Measurement form
It is the Coordinator who is responsible to set up the Innowalk Pro to the user/patient first time.
The measurement form can be used as a baseline to prepare the device,
Set up the device in accordance to measurements
Prepare the Innowalk Pro to the patient/user’s prescribed measurements.
- Adjust sitting height. An optimal position is where the persons hip turning point is slightly higher than the turning point for the knee.
- Adjust seating depth in accordance to the measurement no 3. in the measurement form (Sentre of knee to centre of hip)
- Adjust foot plate position, so there is around 90-95 degrees between upper and lower leg when the person is in sitting. Position the skies in parallel (side by side).
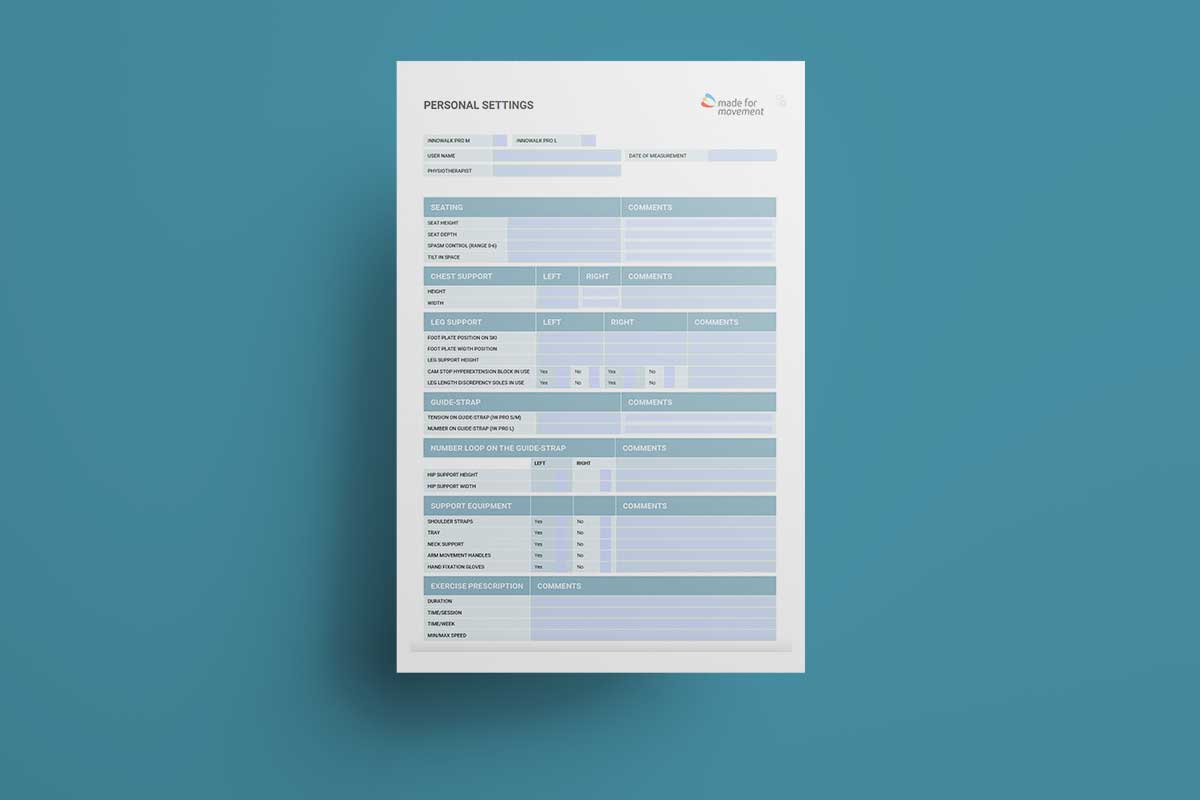
Personal setting forms
Once the device is adjusted for the individual user/patient, complete the "Personal setting form". The form can be used in future sessions to easily repete the same settings.
-
The Operator sets up the device for the user/patient in accordance to the "Personal setting form" provided by the coordinator.
-
Before transferring the user into the device:
- Turn on the device
- Place the Innowalk Pro in sitting position
- Swing away the leg supports
- Open all straps, chest and hip support, release the guide-straps
- Position foot plate on the entrance side in lowest position in the walking cycle
- Turn swivel seat to preferred entrance side (if used)
- Release the anti-overstretch (cam stop)
- Pre-set the spasm control to zero
-
Transfer
Transfer the user into the seat. In the sitting position using the swivel seat the person's feet should be on the ground to increase stability. Support the user carefully, until you have secured the chest support and belt.
The person can also be transferred into the device with a hoist, without using the swivel seat function.
Turn swivel seat to front position
Increase the sitting height before turning the seat to front position. This will allow for easier access of the users feet to locate into the foot plates.
Secure straps over the feet
Make sure the users heels is in contact with the heel cap on the foot plate. Secure the straps over the feet. Make sure the straps are tight enough to avoid the person from moving the feet that may result into an incorrect position.
Attach leg support and guide-string
Attach the leg support to the user and secure the strap. You can adjust the users leg position back and forward in the leg support by adjusting the strap on the upholstery padding.
Attach the guide-string on the hook on the leg support on both sides and adjust the length on the guide-string with the crank handle at the back.
Sitting to standing position
Use the remote control to move the user from a sitting to standing position. To ensure good alignment in standing an operator can push down on the guide-strap when transitioning from sitting into standing. Reduce the tension on the guide-strap gradually when the person is standing in the desired position.
The grade indicator can be used to define individual amount of stretch position.
Secure the hip belt
Adjust the hip supports into the desired position (at the level of Trochanter major) and secure the hip belt.
-
Release hip belt
Always release the hip belt in standing, before lowering the user down into sitting position.
Lower the device into sitting position
Use the remote control to lower the user into a sitting position. An operator can put pressure on the guide-strap to avoid the person from sliding down on the seat during the transition process.
Release the leg support
Release the straps over the feet. Unhook the guide-straps, release the leg supports and swing them away.
Turn seat to side position
Increase the seat height to release the feet from the foot plates. Turn the swivel seat to side position desired for preferred exit. Pay attention to user's legs when rotating the seat, so they don't get tangled. Lower the seat down, so the person's feet are in good contact with the floor.
Release the chest support
Support the person, when you release the chest belt and support. You can now transfer the person safely out of the device.
A hoist can also be used to transfer the person out of the device. Ensure slings and hoists are securely attached and in position before releasing the chest supports.
-
The tray can be swiveled away or removed when it is not in use.
Attach the tray by entering the tube-bracket. Pull down the knob and swivel the tray to front position. Pull down the knob to swivel the tray away.
Adjust the height of the tray by releasing the knob at the back of the column. Slide the tray up/down to the desired position and tighten the knob again.
Depth and angle of the tray is adjusted by loosening the adjustment knobs under the tray.
The tray can be assembled so that it can swing either to the right or to the left side.
-
Attach the bracket for the shoulder straps to the column. The top end of the straps inserts through the bracket on the column and the bottom end of the straps inserts through the receivers attached to the chest belt. Adjust the length of the straps, so it supports the user well in standing.
Shoulder straps are included in the standard configuration.
-

The Neck collar can be used if the user has limited head control. It is available in 3 sizes:
Neck circumference
- S: 30 cm (+/- 5 cm)
-
M: 40 cm (+/- 5 cm)
-
L: 50 cm (+/- 5 cm)
Size S and M are included in standard configuration for the size medium Innowalk Pro. Size M and L are included in standard configuration for the size large Innowalk Pro.
-
Attach the arm handles in the brackets and adjust to desired height. Position the handles by releasing the two knobs.
Ensure when tightening the knobs, that the locking joints are interlacing:
-

Hand fixation gloves can be used in combination with the arm handles to support positioning of the hands.
Hand fixation gloves are included in the standard configuration.
-
The build up soles can be placed on the footplates to compensate for leg length discrepancy up to 2 cm.
Build up soles are included in the standard configuration.
-
The body plate provides additional support in the device and is suitable for individuals with limited control of the lower trunk.
Fasten the bracket to the column of the Innowalk Pro and attach the body plate straps to the bracket. The bracket can be moved up or down to achieve the correct positioning. The tightness of the body plate is adjusted using the Velcro.

-
A tablet holder with a flexible arm is available for the Innowalk. It is mounted on the front tilt and uses spring-loaded clamps to secure the tablet. The flexible arm, together with the ball joint at the top, allows for easy positioning, tilting, and rotation.

-
Possible solutions
- Use the tilt function to recline the Innowalk Pro. This can help the user/patient balance the head and trunk.
- Use the shoulder straps for support.
- Attach the tray table in the preferred height in front of the user/patient. Let the user/patient support the underarms on the table. This can encourage a more upright position of the head and trunk
- Use neck support in the right size fitting the user/patient to support the head
- All mention solutions can be used separately or combined.
- Use the tilt function to recline the Innowalk Pro. This can help the user/patient balance the head and trunk.
-
Possible solutions
- Position the foot plates forward on the skis to compensate for reduced ROM in the ankles. The user’s/patient’s lateral malleolus should be a few centimetres in front of the knee joint when the foot is in the lowest position. Adjust the footplates symmetrically.
- When adjusting the foot plates forward, bear in mind, that there is a need to increase length on the guide-strap. Adjust the length of the guide-strap in accordance to position of the legs.
- Observe the position and the movement of the ankle when the use/patient is in standing and in movement
- If the patient is lifting the heel up while moving there is a need to move the foot plates increasingly more forward
NOTE! Do not tighten the front strap over the foot when using fixed orthoses, as no plantar or dorsiflexion will be possible.
- Position the foot plates forward on the skis to compensate for reduced ROM in the ankles. The user’s/patient’s lateral malleolus should be a few centimetres in front of the knee joint when the foot is in the lowest position. Adjust the footplates symmetrically.
-

Due to reduced ROM in knees and hips, it may not be possible to achieve full extension in standing. There is a need to allow the user/patient to be in a midway position of sitting/standing.
Possible solutions
- Measure the extension deficit in knees and hips before testing out the Innowalk Pro, to know how much the user/patient can extend into a standing position.
- Have the user’s/patient’s most affected leg in the lowest position in the Innowalk Pro while seated.
- NOTE! The guide-strap should be tight when sitting.
- Observe closely the user’s/patient’s most affected knee when moving from sitting to standing position.
- STOP in the position according to ROM in knees and hips (a goniometer over the knee joint can be used to control ROM). The position indicator ruler on the seat can be used as a reference value for future sessions.
- Solution described in FAQ 2 can also be used.
-

When moving the user/patient into full stretch in standing the user/patient will compensate with “anteversion” of the pelvis if he/she has an extension deficit in the hips.
Possible solution
- To avoid compensating movement of the pelvis move the seat on the Innowalk Pro down a little into increased sitting position, by pressing the «down button» 1-2 times on the remote control. This will allow for some flexion over the hips
- Observe that the user’s/patient’s pelvis is in a natural position
- Shorten the length on the guide-strap if more stretch over the knees is available & desired
-
Possible solution
- Measure the leg length discrepancy and use the extra build up sole inserts supplied on the shortest leg (compensate up to 2 cm difference).
- Observe the movement when the patient is standing to make sure that the movement is symmetrical. If the patient is overstretching on the leg, please see FAQ 6.
- Measure the leg length discrepancy and use the extra build up sole inserts supplied on the shortest leg (compensate up to 2 cm difference).
-

Possible solutions
- Ensure that all settings on the Innowalk Pro are symmetrical and that the user/patient is positioned symmetrically
- Control the length on the guide-strap. Is the guide-strap too short and causing the extension pattern? Lengthen the guide-strap.
If it is not the guide-strap causing the extension pattern, the patient might need to have some flexion over the hips to “control the spasticity”.
- Move the seat on the Innowalk Pro down a little into sitting position, by pressing the «down button» 1-2 times on the remote control
- Or use the cam stop/anti-overstretch to reduce extension over the knees
-
Possible solutions
- Check the position of the calf bow/shin support – is it too high/low?
- Check the distance between the foot plates. If the patient is standing with too much of a width stance, the pressure will increase on the medial side of the knee
- Check the upholstery padding– is it positioned correctly?
- Check the position of the calf bow/shin support – is it too high/low?
-
Possible solutions
- Ensure that the hip supports are symmetrical in height and width.
- Check that the all settings on the footplates/ski’s are symmetrical.
- Check for leg length discrepancy.
- Check ROM of the knees, do they differ from each other? Adjust in accordance to the leg with decreased ROM (FAQ 2), or use the cam stop (FAQ 6), to achieve symmetrical position.
- In case of pelvic rotation that is not related to any of the above-mentioned adjustments or leg discrepancy. Stop the movement of the legs and align the position of the user/patient and tighten the hip belt for better support.
- Ensure that the hip supports are symmetrical in height and width.
-
Possible solution
In most cases this is caused by too long sitting depth. It is recommended to decrease sitting depth to reduce the movement of the chest support from sitting to standing.
-
AFO’s can be used in the Innowalk Pro, but you should be aware of the limitations in range of motion in the ankle joint this might cause. To compensate for this, adjustments are needed on the footplates and the length of the guide-strap.
For details on adjustments see FAQ 2.
-
In most cases when the user/patient is allowed to weight-bear, move in a gait like pattern and is pain free when standing, the Innowalk Pro can be used.
Nevertheless, it is recommended to discuss potential contraindications and precautions with the physician before use.
Always pay close attention to the user/patient during movement in the device and in case of any negative reaction the session should be stopped.


-

1. Download app from App
Search for “Innowalk Activity Tracker” in the App Store or Google Play and download the app.
Note:
The app only connects to Innowalk Pro devices with Bluetooth.
A Bluetooth symbol will be visible on the device’s side panel near the power connection if supported.2. Create an account
Fill in details to create an account for your organisation.
Under terms and condition you need to activate "I agree to storage, use, and processing..." if you want to store registered sessions.
3. Connect the Innowalk Pro
Open the app and connect to your Innowalk Pro via Bluetooth.
4. Account Setup and Roles
Your Made for Movement representative will assign an admin in your organisation.
The admin can create and manage the following roles:-
Coordinators (email-based)
-
Can add coordinators, operators, and users/patients
-
-
Operators (email-based)
-
Can add users/patients
-
-
Users/Patients
-
Can be added with or without an email account
-
5. Adding Users/Patients
-
Go to your account dashboard.
-
Click “+ Add patient”.
You can choose between:
-
With personal email:
Users can log in and view their own data in a personal account. The user/patient will receive an email with an invitation to create a personal account. -
Without personal email:
Data is stored and visible only in the organisation’s account.
6. Deleting Users/Patients
-
-
If you delete a user/patient from the organisation’s account, all associated data is permanently removed.
-
If the user/patient has their own email login, their data will still remain in their personal account even if removed from the organization.
-
7. Registering a Session
To start recording a session:
-
Open the app
-
Tap the “+” button
-
Begin the session
-